How to Setup DHL eCommerce APAC Woocommerce Plugin
Introduction
With the official DHL eCommerce plugin, you profit from a quick and simplified shipment process enabling you to create DHL eCommerce labels and send tracking IDs to your customers. Manage your shipments through one single shipping provider by using DHL eCommerce App.
To WordPress Plugins Store listing
Functionalities
- Fast and easy label creation for domestic orders for single or bulk creation.
- Use complete DHL value added services like Cash on Delivery, Service Value Protection, Open Box and Multipiece.
- Bulk order creation for different payment methods.
- Generate multipiece label for an order that cannot be pack in one go.
- Reprint labels.
- Request for pickup upon shipment creation.
- Download labels for multiple orders, using the bulk label print option.
- Remarks field is now visible in the label.
- Generate tracking ID for each label for easy track and trace.
- Cancel your shipment before pickup is done.
- Experience premium support, timely compatibility updates and bug fixes.
Requirements
You need a valid business customer contract with DHL eCommerce including valid access data for the DHL API interface. If you do not have a contract or access data yet, please reach out to click here.
DHL Ecommerce APAC Add Plugin Steps
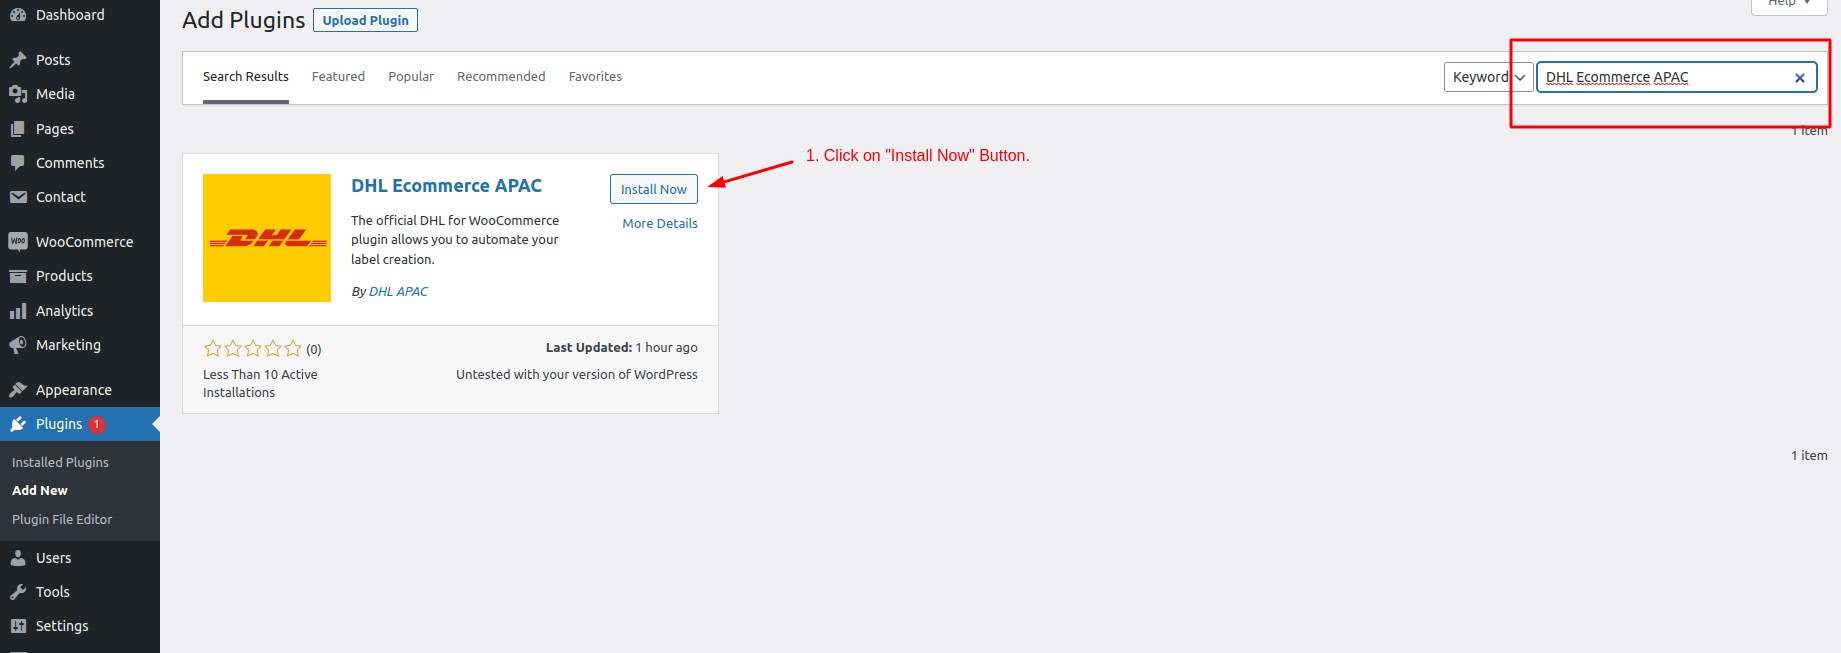
Add Plugins
For Add plugins in wordpress – follow the below process:
 Follow the below steps :
- Click on “Plugins” -> “Add new”
- “Search plugins…” to search “DHL Ecommerce APAC”.
Install DHL Ecommerce APAC Plugin
For Install plugins in wordpress – follow the below process:
 Follow the below steps :
- Click on “Install Now” button to install plugins.
Activate the DHL Ecommerce APAC Plugin
For plugin activation in wordpress – follow the below process:
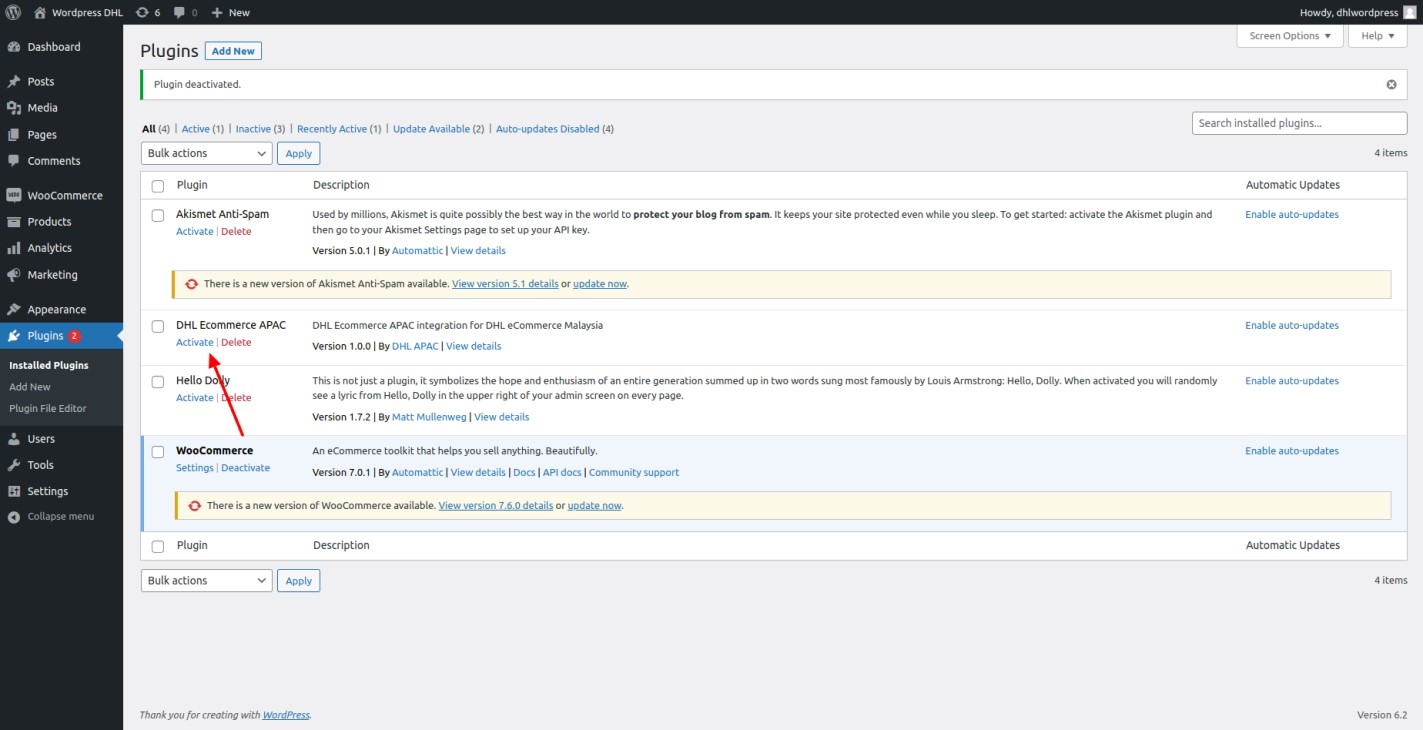 Follow the below steps :
- Click on “Plugins” -> “DHL Ecommerce APAC” -> Activate to click on “Activate” button.
Plugin Configuration Settings
For updating the configuration settings Options – follow these steps:
 Follow the below steps :
- Click on “DHLeCS” -> “Configuration Settings”
- Please refer to your email from DHL for the required credentials.
- Click on the “Add pickup Account” link if you don’t have any pickup account set up.
- Setup your configuration credential in the settings page.
- Save changes by click on “Save Form” button.
Add Your Pickup Account Details
Note : Mandatory ( * ) fields are required.
For updating the Pickup Account – follow the below process:
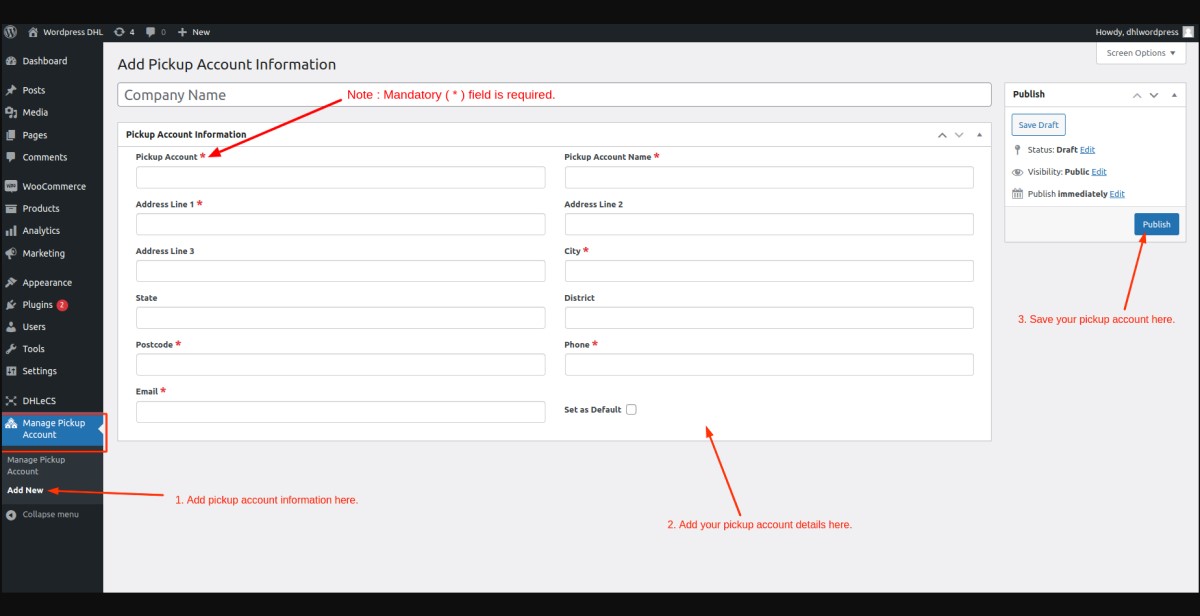 Follow the below steps :
- Click on “Manage Pickup Account” -> “Add Pickup Account Information”.
- Add your pickup account details.
- Save changes by click on “publish” button.
- Once saved, you can select this Pickup Account during DHLeCS settings.
Create DHL eCommerce Shipping Label
Step 1 :
Note : It is required to fill in the shipping weight.
For Create Shipping Label – follow the below process:
 Follow the below steps :
- Click on “WooCommerce -> Orders” to edit your order.
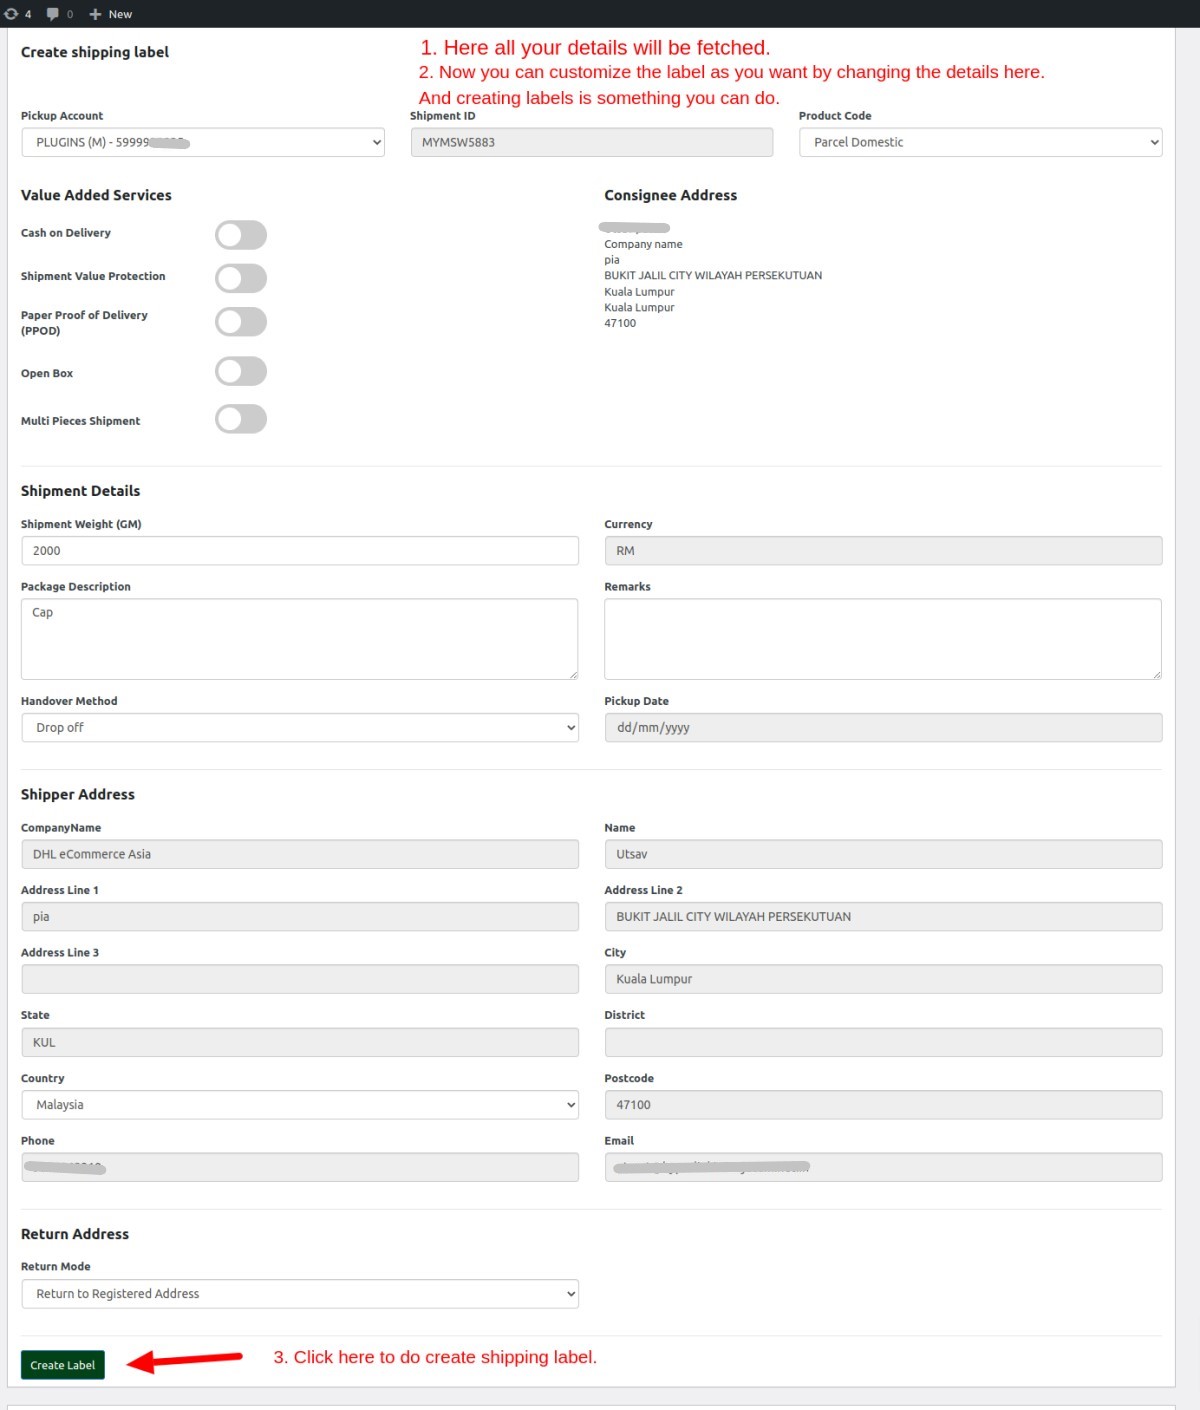
Step 2 :
For Create Your Shipping Label – follow the below process:
 Follow the below steps :
- Here all your details will be fetched.
- You can customize the label as you want.
- Click “Create Label” to do create shipping label.
Step 3 :
Once you have Create Shipping Label – Show as per below screenshots:
 Follow the below steps :
- Check the DHL Label metabox.
- Click on the image to download your label.
How to Edit Shipping Label
Step 1 :
To Edit Shipping Label – follow the below process:
 Follow the below steps :
- Click on “Edit Label” button to edit existing shipping label.
Step 2 :
 Follow the below steps :
- Click on “Edit Your Order” -> “DHL Label” -> “Edit Label” to Edit shipping label.
- Edit any necessary information.
- Save changes by click on “Update Label” button.
Step 3 :
After clicking the Update Label you will get the result for shipping label like the screenshots below:

- It will Show your label with the updated information.
How to Cancel A Shipping Label
For Cancel Shipping Label – follow the below process:
 Follow the below steps :
- Click on “Edit Your Order” -> “DHL Label” -> “Cancel Label” to click on “Cancel Label” button.
For Cancel Your Shipping Label – follow the below process:
This is what you will get when you cancel a shipping label.
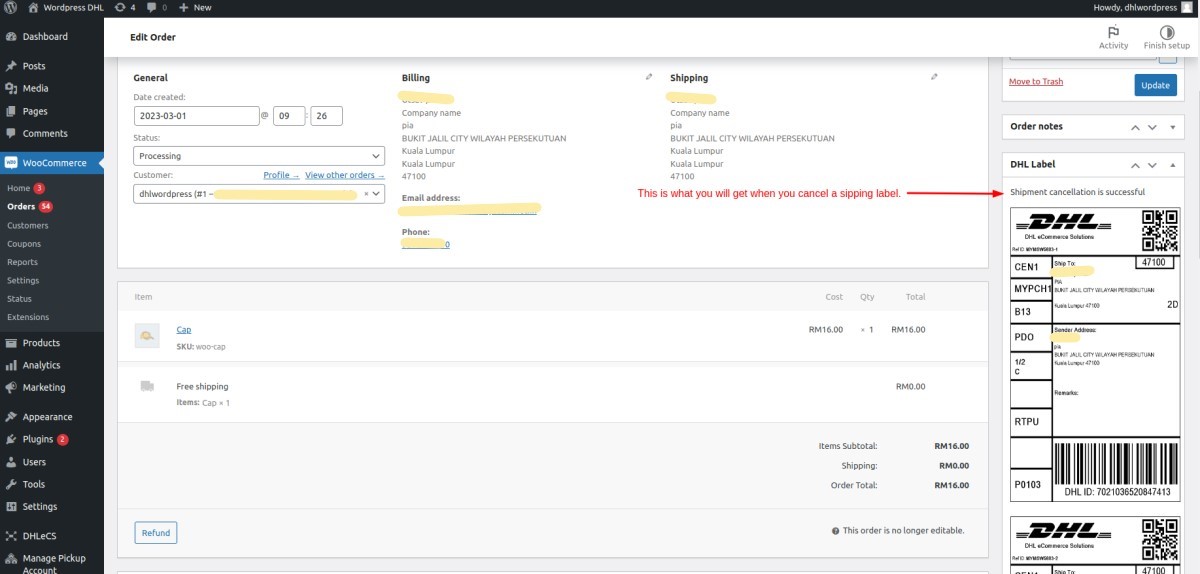
- It will Show your label with Cancellation Successful notice.
How to Create Bulk Shipping Label
Use this option if you want to create shipping labels for multiple orders at the same time. – follow the below process:
 Follow the below steps :
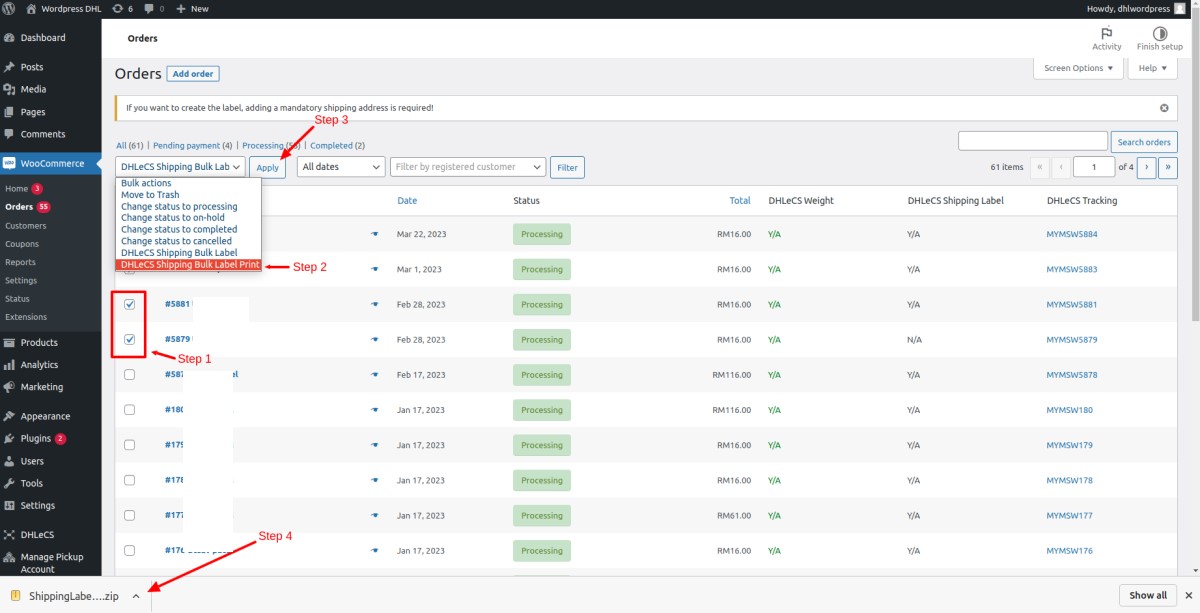
- First, select the orders in which you want to create the shipping label.
- Then, under Bulk Actions, select “DHLeCS Shipping Bulk Label“.
- And then click on “Apply”. After applying, you can verify that your label is successfully generated by editing the single order.
How to Print Shipping Label in Bulk
Use this option, if you want to download shipping labels for multiple orders at the same time. – follow the below process:
 Follow the below steps :
- First, select the orders in which you want to download the shipping label.
- Then, under Bulk Actions, select “DHLeCS Shipping Bulk Label Print”..
- And then click on “Apply”.
- All the shipping labels will be zipped in a single downloadable file.
If you need further support related to DHL eCommerce Plugins for APAC, please contact your local DHL representative.